Tuesday, May 31, 2011

Sweet little birds

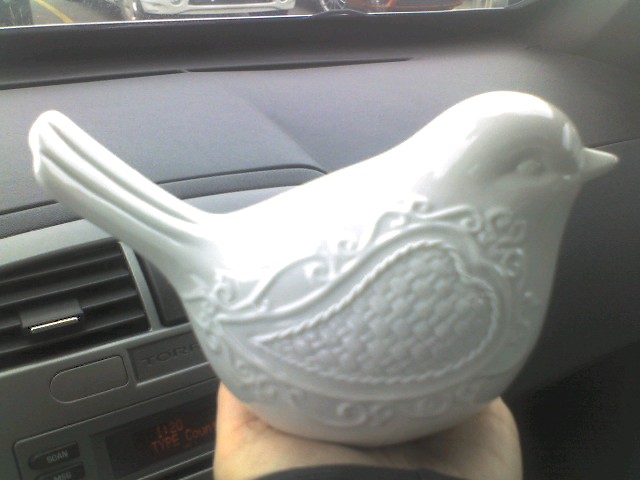
I've become obsessed with fat little birds. I can't explain it. I love them. They are mod and quirky and cute.  I decided I needed to have them in my house.  I already have a cute little white ceramic one that is still looking for a home, but wanted something a bit more punchy.

I also didn't want to spend any money. This bizarre thing has happened since I started this whole blogging thing. I can't believe it's possible, but I've gotten cheaper. I look at stuff in stores and think, "Huh, I could make that." And don't buy it. And most of the time, I don't make it either, because that would take planning and thinking and right now, I don't seem to have the time for either of those things.

But, I digress...back to my chirpy little birds.

I had a set of pictures from our old bathroom back in Colorado. They didn't fit the style of the house at all, but I figured I could repurpose them somehow, so hung onto them.

Here they are in all their glory.


Pretty standard bathroom art you can buy pretty much anywhere. Not horrible, but not what I wanted.

I tore them apart. Poor things didn't stand a chance. And I didn't take any pictures. I have no idea why. Sigh.

Anyway, I got them down to the bare frames and glass. Then, I primed them and spray painted them chrome with some spray paint I bought years ago. Covered like a dream! They looked great!

Next, I cut two pieces of scrapbook paper to the size of the frame. Then, I used my Silhouette to cut out two chubby little birds from pink and orange card stock. I use a glue stick to attach the birds to the scrapbook paper. As I was laying the birds out, I decided to swap the beaks, wings and tails to give them a little more interest.


(These are hanging in the same room which doesn't have any windows, one is by the light and the other isn't. The first one is more true to the colors. No matter how much I tinkered with them in Paint.net, I couldn't get them the same color.)

Originally, I'd planned on hanging these cuties in the kitchen, but they just didn't look right with the chrome frames on gray walls.

Here they are hanging in the downstairs bathroom.


And the best part is, they were free! I had the frames, spray paint and scrapbook paper. Cheap, cheap!

Once we get a couple more finishing touches on this room, I'll show you the whole thing. It's turning out very cute!


Thursday, May 26, 2011

Quick and easy teacher gifts

I haven't done one single thing for my son's pre-school teachers all year. I feel horrible about it. He's got 3 great pre-school teachers. And, 3 great daycare teachers. And my daughter has 3 great daycare teachers too.  See my dilemma? 9, count 'em, 9 people to buy gifts for? Overwhelming.

But, since this week is his last week of preschool, I decided to make a little something for his preschool teachers.

Easy, simple and cute!


I started with plain white mugs that I got at the dollar store.  I used my Silhouette to add black mongrams in Century Schoolbook font.


I had three favor bags we'd gotten from a wedding we were at a couple of weekends ago, so I filled them with dark chocolate Hershey kisses. (Because really,  who doesn't love getting chocolate?)


They still needed a little extra something, so I used my Silhouette again to create a Thank You tag.


I wanted to include a personal note to each of his teachers, but all of my stationary is still packed away in a box somewhere down in the basement. Instead of stationary, I cut a piece of coordinating scrapbook paper, wrote my note on the plain side of my paper, then rolled it up and tied it with some left over ribbon.


On my way to daycare, I stopped and picked up Starbuck's gift cards and tucked them in the back as well.


I'm really happy with how they turned out!


Friday, May 20, 2011

Dining Room Then and Now

I have no idea why it's taken me so long to get this one posted. I took the pictures the same day I took the ones for the bathroom post.  Time gets away from me!

Anyhoo...

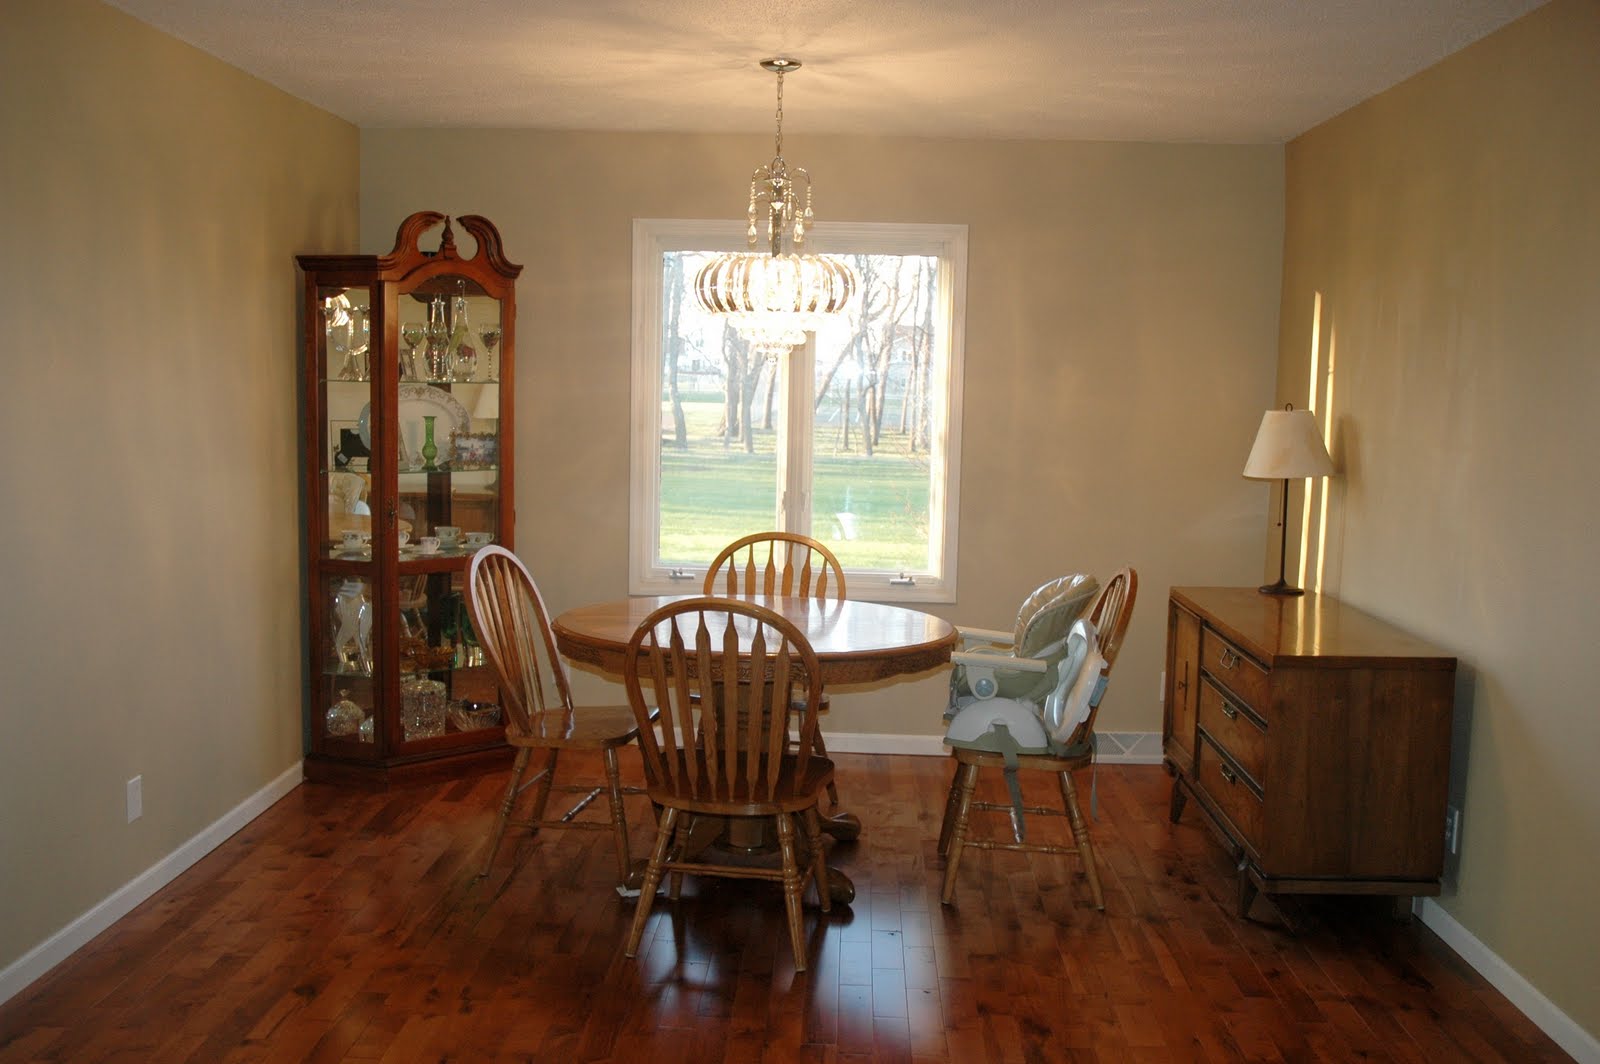
The dining room was actually in pretty good shape. With the exception of the carpet. I don't understand why people put carpet in dining rooms. I really don't.  We did it once. Don't know why. I do know that it will never. happen. again.


We ripped out the carpet, took all trim off (not just in here, but the whole house!), and painted the walls a simple tan (Behr - Gobi Desert). Then, we installed a beautiful maple hardwood floor. (We hired this out and it was one of the best decisions we made during this process!) After the floors were down, the nice, clean, white trim went up! I love white trim. Makes every color pop! We also spray painted all of the dark wood window frames white. It was a pain in the you-know-what, but they look brand new!

(Have I told you when I say "we," I really mean my wunnferful hubby? No? Huh.)


Not bad! We are getting there. But I wasn't in love with the light fixture. It was just OK. A perfectly nice fixture.  I wanted something with a little more personality than "perfectly nice." And, when you walk in the front door, you see all the way through to the dining room. The existing fixture was dark and low and your eyes stopped at it. It also made the already low ceilings seem even lower.

Enter sparkly-acrylic lovelieness. Fantabulous! I love it.  (Who knew you could fall in love with a light fixture?!) It doesn't obstruct your line of vision. It also makes the ceiling seem much higher. And, as an added bonus, it makes rainbows on the walls! Perfecto!


We've only got bare bones furniture in there now, but it's functional. I've got some ideas on how to liven it up.  I think we are going to eventually move the buffet onto a different wall and get a skinnier side table to replace it. It's a bit of a tight squeeze now to get drawers open. We may also had a tall wine rack in the corner to balance out the curio in the opposite corner.  Do you like the highchair? I was too lazy to take it off to take pictures.


We are soooo happy with the way it turned out!


I can't decide which room to show you next...family room? master bedroom? kitchen? mudroom? Decisions, decisions.

It's supposed to be rainy and crappy here this weekend. Yay! Not.  But, it does give me the chance to hopefully get some crafty projects done.

Monday, May 9, 2011

Tweetie bird

I found this little sweetheart on clearance for $2.00 at Michael's today during my lunch break. I have no idea where she is going to go, but I had to have her.

Tuesday, May 3, 2011

The Home Stretch

We've been remodeling the house we bought back in November and are in the home stretch. Our lease was up on the rental house May 1.  We moved in Easter weekend. It was insanity. I HATE moving. But, I love our new home.
The transformation is pretty remarkable. We hired out the carpet and hardwood floors. Sparky did the rest (with some help from friends and family). It's been a long haul, but it's going to be great!

One of the biggest transformations has been the upstairs bathroom. We originally weren't going to do it, but we were able to cut budget in a couple of other areas to get it done. And, it's beautiful.
This is what the upstairs bathroom looked like when we had our inspection.


Well, we basically tore the whole thing apart. The shower and tub area went down to the studs. The toilet came out. The sink, vanity and light were gone.

Here's how it looked tonight:


The room doesn't have much regarding accessories, but we LOVE it. The tile is great and the room feels so much bigger!

I have a couple of inspiration rooms that I'm thinking about for this space.

I love what Emily Clark did with her kids bathroom.


I also love what Chris at Just a Girl did with her kid's bathroom too.


Maybe I'll try to combine the two. Ya never know. I'm kinda crazy like that.


I can't wait to show you the dining room. You wanna see my favorite thing EVER? Ok, here is a sneak peak.


(I need to figure out how to take a great picture of this fixture, cause this one doesn't do it justice.)


Monday, May 2, 2011

Let the fun begin!

Yay! We are moved into our new house! Now, the fun begins. After the unpacking is done. Sigh.

I hope to have some great before and after posts coming soon, but first I need to take the after pictures. This is what I struggle with. Do I take them now, even though the rooms aren't "finished?" I'm thinking yes. Otherwise, it's going to be eons before I do another post.  Maybe tonight. Maybe I'll get some pictures taken tonight. Yeah, tonight. Definitely tonight. I think.

Keep your fingers crossed!

Wednesday, April 20, 2011

So much to do and no time to do it

It's been pretty crazy around here lately. I've had to travel for work and we are still remodeling the new house. But, this weekend is the big move! Woo hoo! I know that I need to get before and after pictures up, but just haven't had a chance to 1. take any and 2. think about the order to do the posts.  They will be coming, I promise!

I've also been struggling with doing any other kind of project. I've got a list of things I want to do, but just haven't had time to do any of it.

Want to see the list?


Yeah, this is how I'm tracking all the great ideas I've been seeing on the interweb. I've got a "ToDo" folder in my favorites. Everytime I see something I want to do, I stick in that folder. And you can see about a quarter of them in this screenshot. And, I have a little notebook in my purse that has more stuff. Sigh. Oh, and I was looking for something I saw at Hobby Lobby today online. It was a cool monogrammed frame. Couldn't find it online.  I'll take a picture the next time I'm there. Very cute and would be super easy to do at home.

Here's a sampling from my ToDo list:

Pottery Barn Richard Leaf Planter

Hooded Bath Towel

Distressed Family Definition Sign

Marble Magnets

Why must work and family get in the way of my crafting? Sigh. Just kidding. Sort of. Wink.

Question, how do you track your craft or DIY backlog?

Sunday, April 3, 2011

Here comes Peter Cottontail!

When Easter starts getting close, I start humming "Here Comes Peter Cottontail."  So, what better way to decorate for Easter than to use the lyrics!

Besides the St Patrick's Day "subway" art, this is probably the easiest thing I've made. Seriously.

But, I only knew the first part of the first verse, so I looked the lyrics up online. (Did you know Gene Autry sang it? I didn't.) Anywho, once I saw all the lyrics, I decided to use the entire first verse.  And, I knew I wanted to add Peter to it as well.


Honestly, picking the paper and the font took the longest for this project.

I typed up the verse using Lucida Calligraphy in Microsoft Word and printed it on a piece of green cardstock. Then, I downloaded an Easter design from the Silhouette Store. The bunny had an eye, which I didn't want, so I ungrouped the objects in Silhouette Studio and deleted the eye, and cut it out on some cute polka dot paper.

I taped the bunny onto the cardstock with the verse and put it in the frame.

Easy peasy lemon squeezy.

Sunday, March 27, 2011

It's Spring! Right?

I think in other parts of the country, it's spring. Up here, we've still got snow and it's close to zero at night. I think the high the past couple of days has been 30 degrees. BRRRR.

I am soooo ready for spring to get here.

To bring a little spring into the house, I made a quick and easy little project today. Remember the blocks I did for Valentine's Day? Well, they were cut from a 2x4 and were only three of like 10-12 blocks ( I can't remember how many are left out in the garage).

I didn't want to do Easter specific blocks, so I decided on a spring theme.


April showers bring May flowers. Get it? I thought I was being pretty clever.

I started by sanding down the rough edges of the blocks. (This was done in the nice, cool garage. With my jacket on.)


Then, I brought them in and put them on my work surface. (Also known as a flattened out Bud Light box on my kitchen island. Oh, how I dream of the day when I have my craft room!)


Next, I painted them Antique White (cream) with craft paint. I put two coats on two sides, and three coats on the sides I was going to put the decorations on.  I didn't bother painting the bottoms.  In between coats of paint, I cut out shapes using my Silhouette and scrapbook paper that I already had.  The equals sign was a little puny to begin with, so I decided to layer  two  different kinds of paper to make it.

(I'm still learning how to use my Silhouette and I know I'm not using it in the most efficient way, but practice makes perfect right?)


Next, I put on the umbrella, equal sign and flowers with Mod Podge.  About half way through, I decided the sides needed a little bit of detail as well, so I used my Fiskars straight cutter and cut squares to fit the other two sides of the blocks and Mod Podged them on as well. (Is Mod Podged a word? Hmmm.)


At this point, they still looked like the could use a little something, so I used a distressing ink and just rubbed the ink pad on the edges and wiped it off with a paper towel. 


Here are my lovelies, on the window sill with my awesome Celtic scentsy warmer (Green Tea and Cactus is the current scent. Loverly). And of course, a bunch of snow is in the background.  I've been changing the order of the blocks every time I walk by. Right now, the umbrella and equals sign are swapped.  I'm sure I'll change them again tomorrow.

Linking up with:


Funky Junk's Saturday Nite Special

Wednesday, March 23, 2011

Pork Loin Two Ways

I don't know if we invented it, but boy did we (ok, Sparky, my husband) come up with a great way to prepare a pork loin!

It's so simple, I don't even have any pictures. (That could also be because I just thought of doing this post while I was making supper tonight, not when we had the pork loin.)

Place pork loin in a crockpot
Wrap in bacon
Turn crockpot to low and go to work and let cook for 8+ hours

That's it. And let me tell you, it's WONDERFUL. The smoky flavor of the bacon infuses the pork and the bacon grease keeps it nice and moist. Serve with whatever side you'd like.

We had quite a bit of the pork loin left over, and it was so tender that it was pretty much shredded already. I could've just poured a bottle of Jack Daniels BBQ sauce on it and had pulled pork sandwiches, but I was feeling like Mexican.

Pork enchiladas, hear we come!

This recipe is adapted from the recipe on the can of Old El Paso Mild Green Chile Enchilada Sauce. (I tried to find the recipe on their website, but had no luck.)

Creamy Pork and Chile Enchiladas
2 C cooked, shredded pork
1 package (8oz) cream cheese, cut into cubes
6 whole wheat tortillas
2 cans (10oz) green chile enchilada sauce
1 can (4.5oz) chopped green chiles
2 C shredded cheddar cheese (The orignal recipe called for 3/4 C cheese, really? The cheesier the better I say!)

1. Heat oven to 400. Spray 13x9 inch glass baking dish with cooking spray.
2. In a non-stick skillet (love my Rachael Ray's!), warm pork through. Stir in green chiles and cream cheese. Cook until blended.
3. Spoon pork filling into tortillas, place seam side down in baking dish. Pour enchilada sauce over entire pan. Top with cheese. Bake for 15-20 minutes or until cheese is melted.


To go along with our yummy enchiladas, I threw together onions, peppers, sweet corn kernals, and black beans in a pan and cooked 'em up.

I love mine with a little light sour cream and avocado. (I could eat avocado with a spoon, all by itself. Oh wait, I do actually do that.)

As Backpack from Dora the Explorer would say, "Delicioso!"

Tuesday, March 15, 2011

Better late than never St. Patrick's Day Crafty Crafts

We've had a tough month around our house, but hopefully things will start looking up in the coming weeks! Thanks for being patient and sticking with me!

I did manage to get a couple of little St. Patrick's Day decorations made. I love St. Patrick's Day. My ancestors are Irish and it was always a big deal around our house. My husband, who is a teensy-tiny bit Irish, also loves the holiday. I think mainly because of the green beer, but I have to admit, I like that part too.

So, without further ado...here is what I came up with for St. Patricks' Day.  My inspiration was partially from what I did for Valentine's Day as well as a couple of posts that I've seen over the past month or so. (I want to apologize for the great bloggers that had a couple of  these ideas. I thought I'd bookmarked them so I could link to them, but can't find them now. If you remember seeing them, please comment with the link!)


Super easy! I drew a couple of lines for the bouquet. Then, I used my Silhouette to cut out a bunch of hearts and used double-stick tape to attach them. After that, I drew a bow with a silver paint pen and added some fake rhinestones from Hobby Lobby. I had all the paper, so only had to buy the rhinestones with were a couple of bucks for a bunch! I think I might put this in frame and keep it up year round.


For the candle, I took off the Valentines ribbon, used my Silhouette to cut out shamrocks in different colors and sizes and used double stick tape to attach them. I see great things in this candle's future. It's so versatile!


I used this little bucket for Valentine's Day too. This time, I took the dead plant out of it and turned the BE MINE to the back. (We weren't home for a while and it didn't make it.)  I used my Silhouette (again, sensing a theme here?) to cut the shamrock out of vinyl and added a fake little ball plant thing I got at Hobby Lobby for 50% off. I think I paid $1.50 for it. I had everything else on hand, so this little gem was cheap!


This was probably the easiest of them all. I used Microsoft Word and a bunch of different fonts and greens. I did have to look up Gaelic words online for some of them. Then, I printed it off at home on plain old copy paper and stuck it in a $3.00 frame from Wal-Mart.


This is my little corner shelf where everything is at.  It's become my theme shelf.

The other little vignette I created was super easy as well.


I found a font I liked in Microsoft Word and cut it out with my Silhouette along with one of the shamrocks I'd printed earlier.  I'd had some fake stems from a few years back that I threw into a little white vase I'd gotten from my husband's grandparent's house. I have three and love them.  So, again these were both free. Woo hoo!

We are making a lot of progress on the new house, so look for posts on that coming soon too!

Friday, February 25, 2011

I'm still here!

I'm still here! I've got a couple of projects up my sleeve that I've been working on.  I'll get a post up soon. I promise!

Wednesday, February 9, 2011

Kitchen sneak peek!

There's been a lot of work and a lot of progress made on the house! We actually starting painting this weekend. I'm so excited! (You can see some of the befores here.)

One of the biggest transformations though, has been the kitchen. We aren't changing the footprint so much, but everything this else is getting a facelift.

Here's a sneak peek at what we've done so far.

As a reminder, here's what the kitchen looked like when we had our inspection.


So, what have we done? Well, wall paper is gone, beams are gone, light fixtures have been replaced with can lights (LOVE!), and the cabinets on the far end have been removed. We are planning on putting in a pantry of some sort on that end and probably a counter or table to eat breakfast at.


 This past weekend, Sparky (aka, my electrician husband) popped all of the decorative stuff off the front of the cupboard doors. They were glued on and he used a wonder bar (not to be confused with a wonder BRA), and hammer and they popped right off.  Then, he filled them with some putty and sanded them a couple of times.  They are pretty much ready for a new coat of white paint!

He also broke out the saws-all and cut off the little fence thing (so, technical...I know, but that's what it looked like to me).  Such a big difference! LOVE, LOVE, LOVE it! It doesn't even look like the same place. Even with just primer on the walls.


I can't wait to get the lovely gray paint we picked out on the walls and the new tile floor down!