Tuesday, July 26, 2011

Well, duh!


I had kind of a “well, duh!” moment the other day after reading this post from Karen at The Art of Doing Stuff.
We have a bajillion daylilies. No, really. We haven’t done much with the outside of the house since moving and as a result, have a jungle on the west side of the house.

See?


Oh, and I found this little yellow guy. I hadn’t seen him there before. 


So, the other morning, I went and cut some. And put them in bowls.  And put them on my table with a pint jar of daisies (my favorite flower). 


Simple and pretty and I actually get to enjoy them. Thanks Karen!

Linking up with:

Centsational Girl Garden Party

Sunday, July 24, 2011

Dingy Storage Room to Colorful Playroom

When we bought our house our plan for the lowest level was a craft room for me and a man cave for my husband.  I’ve dreamed of having a space to call my own. Where I could leave my crap projects out and organize all my goodies.   Sparky had a poker room in our first house and really missed it.

Well, after living here for three months. We changed our minds.  The kids’ rooms are pretty small and our family room was being overrun with matchbox cars, trains (and their tracks) and blocks.  We couldn’t take it anymore.

So, my husband decided to give up his man cave and give the kids a playroom.

I’d been using the side that was to be the man cave as a crafting area and the other room was being used for storage.   Beware; the pictures to follow are not pretty.  I actually can’t believe I’m showing them at all. But, in order to see how much the room changed in a weekend, it has to be done.
This is going to eventually be my craft room. 


 And this is the storage room.  Holy crap that’s a lot of… well, crap.


First things first, empty the room. You can see the colors we were thinking of going with.  This room is partially finished and that was fine with us. We didn’t plan on truly “finishing” the room. We simply wanted to paint the walls and put down some carpet.  Make it fun a space for the kids to play and make a mess could be easily hidden by shutting the basement door.


One wall did have sheetrock, but it wasn’t taped or anything.  Sparky filled in the screws with spackle, but left the seams alone. The other two walls are concrete. And the plumbing pipe runs across it. The last wall has the furnace and sump-pump.  Once the spackle was dry, it was time to prime. 

We used Killz Latex Primer on the sheetrock and Olympic Masonry Primer on the concrete walls.  RC was very excited about the prospect of getting a playroom and wanted to help paint.


Next up, painting! We knew wanted something playful and fun and bright since it’s a basement room with only two small windows that face north.  The colors we chose were Exotic Sea, Spring Leaves and Pumpkin Burst from Valspar in a Satin finish. 

We decided to paint the majority in Spring Leaves and then use Exotic Sea and Pumpkin Burst for accents.   For the long wall that had the PVC pipe, we decided to paint the pipe the same color as the wall. The far wall became the accent with different sized stripes. We actually used the seams in the cement as our stripes and painted the pipe accordingly.  We also decide to paint the duct work as well. Actually, Sparky decided to paint it and it just adds that little extra something. We aren’t planning on closing in the ceiling and this made it seem more planned and not just plain old duct work.


Three gallons of primer and three gallons of paint later, we were ready for the carpet.  Basements in North Dakota are damp. And sometimes they flood.  We knew we didn’t want to glue any carpet or pad down in the event we did ever get water. Glue pad + wet basement = gross mess.

We also didn’t want to spend a bunch of cash on it.  Solution? Carpet with a built in pad that we just rolled out on the cement.  Sparky cut around the furnace, steps, doorway and trimmed up along two of the walls.


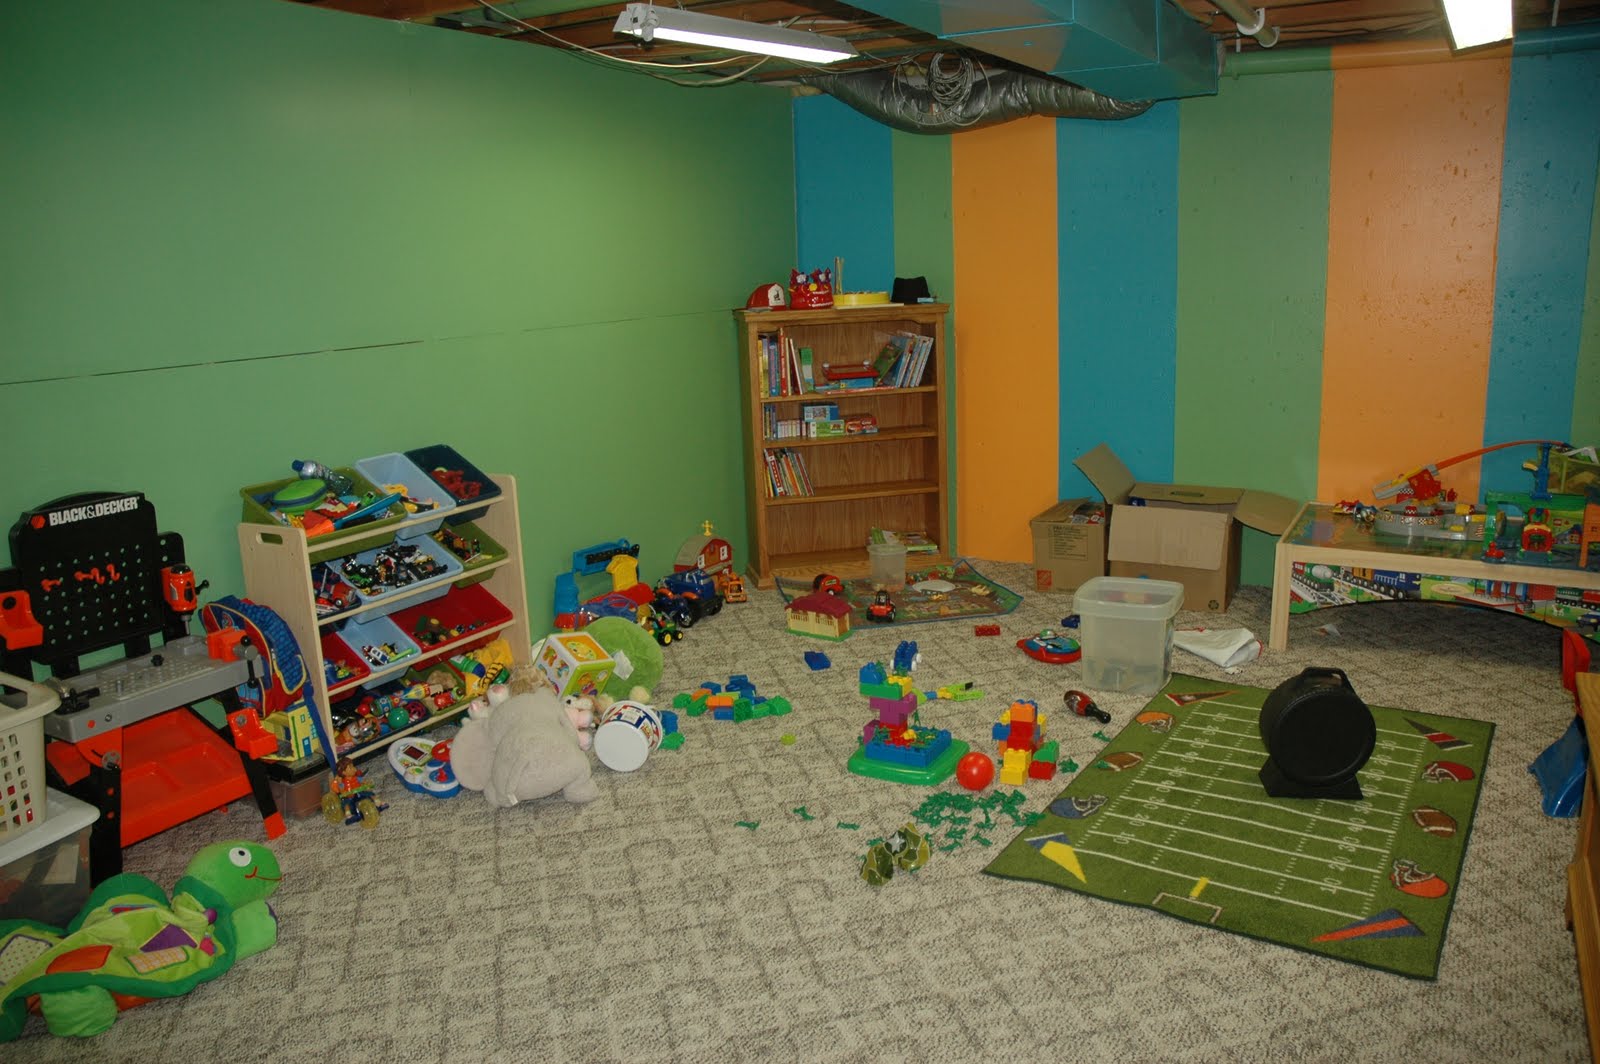
Wow! It looks like an actual room now!  We started priming the walls Saturday afternoon and the kids were playing in it by 5 on Sunday. Not too shabby!

This is how it looked after the kids went to bed. I think they like it. 


We have a list of things that we want to do to the room, but for now it’s exactly what we need! 

Todo list:
Put in door to craft room
Put up some trim and possibly a chair rail
Paint flowers or stencil big circles on the wall
Maybe make the pipe look like snake
Shrink art (saw it on Home by Novogratz and it was awesome!)
Art center – big rolls of craft paper on attached to the wall and art supply organization
Maybe some corkboard
More storage – shelf or cubbies

Nothing major, just finishing touches that are going to make the space more fun and functional.  I've been pinning inspiration like crazy on Pinterest.

Linking up with:

UndertheTableandDreaming


Home Stories A2Z


Blue Cricket Design


Domestically Speaking

Sunday, July 10, 2011

Trunk Makeover and Napkin Pillows

I have a really old trunk. I remember it full of old clothes and dolls at my grandparent's house. It was my great-grandpa's. The orginal lid broke somewhere along the way and he made a "new" one for it. When my grandparent's downsized, it ended up at my parent's house. When I moved I took it with me. It moved from North Dakota to Colorardo and back to North Dakota. Depending on where it's been in the house, it's held board games and blankets. I can't imagine our house without it.

I have no idea what the original color was or if it was even painted before it made it to my grandma's house. It was painted a sage green when I took it from mom and dad's, and I covered the top with some batting and cream fabric with leaves on it. (No pictures, sorry!)

Then, when we re-decorated our basement, I painted it again and recovered it with a faux animal print. It was going in the "man cave" and I had recovered the poker table chairs with the same fabric.


Well, now that we are in our new house, it's time to change it up again.

After taking the lid off, I got all the necessary tools together to take the old fabric off. And yes, wine is a necessary tool for just about every project I do. In the winter, it's red and in the summer it's white.


And, of course I had to get my Emily Henderson fix in too.


A little paint and fabric later, and here it is transformed!


Isn't it amazing what a little paint and a yard of fabric can do?


The pillows on the chairs were a recent project too. As I was wondering around Burlington Coat Factory, I saw these great napkins.


See the price tag?


I had planned on making some pillows out of the pillows that came with our new couch. So, when I saw the color and the pattern on these napkins, I couldn't resist. I bought four of them. 

And turned this:


Into two of these:


For a whopping $8. Woo hoo!

All I did was put right sides together and sewed three sides shut, stuffed them with the old pillow stuffing and sewed up the last side. Easy-peasy-lemon-squeezy.

We are slowly working on the family room and I have some other ideas and projects on my list of things to do to add more color and fun to the room.  


Linking up to:


Funky Junk's Saturday Nite Special


UndertheTableandDreaming

beforeAndAfterButton


I Heart Naptime

<div align="center"><a
href="http://micheleravendesigns.blogspot.com/" title="{Primp}"
target="_blank"><img
src="http://i4.photobucket.com/albums/y103/amycarver3/primpbutton2.jpg"
alt="{Primp}" style="border:none;"
/></a></div>

Wednesday, June 22, 2011

Kids Bath Update

What the what? Two posts in a single week? Inconceivable! Don't expect this too happen to often. I don't want to get your hopes up.

Anywho, my sister wanted the next room to be the mudroom, but there are a couple of things I'd like to do in there before I do a post on it. Sorry Steph!

I did do a couple of little projects for the kids bathroom though. I showed a couple of inspirations for artwork in the kids bathroom back in this post.

Then, I spotted this from Jen over at American Crafts. Instant LOVE! So cute and looked pretty easy.


I picked up a couple of frames on clearance at Michael's and stocked up on buttons. I didn't have any buttons in my house. Unless you count the spare ones that come with every shirt and jacket you buy. But they were't pretty and cute. And I didn't have nearly enough.

This is what I started with:


I followed the tutorial pretty much to the letter (punny, I know). I traced the letters out on my card stock and started filling them in with buttons and brads. It's kinda like a puzzle. Trying to get as many buttons as you can within the lines. It took me a bit longer than I thought it would. Also, it was good to leave it for a day or two, then come back to it.  The empty spaces to seem to jump out better after you stepped away.


I knew I wanted these to be behind glass, since they were going in a bathroom, so I didn't do as much layering as Jen did. Baby Peach got more stars and pink than RC did to make hers a little more girly, but for the most part they look pretty much the same.


 They look exactly like I was hoping they would hanging up!


I also hung a couple of different pieces on the opposite wall. I'd gotten a cute bug calendar from my mom for Christmas.  I just cropped a couple of the bug pictures to fit into more Michael's clearance frames. I love the color and fun they add!


I love that it's kid friendly, but not too cutesy. 

The only thing left in this bathroom is to get a hand towel bar hung up! Yay!


Monday, June 20, 2011

Beautiful old dresser

I knew that I wanted to have an old dresser or buffet for the entry of our house. I had this picture in my head of an antique with cool lamps and a great picture above it.  Who knew that I'd find exactly what I was looking for at my in-laws' house?

I was down in their basement one day this past winter, when I saw her. A beautiful old dresser. I fell in love.

I said to my husband, "Do you know what your dad was going to do with it? Do you think he'd sell it to me?" His reply, "I don't know, go ask him."

I hustled upstairs to find out. He'd pulled it out of an old house he'd bought. He was going to hire someone to refinish it for him and try to resell it. When I asked him how much he wanted for it, my mother-in-law piped up and said, "Just take it!"

Um, ok...you don't have to tell me twice.

And just like that she was mine. For free. Woo hoo!


I've never refinished a piece of furniture before.  I'm don't know what kind of work I'm in for, but I'm sure it will be worth it!

Look at that great hardware! (She's missing one pull. If anyone knows where I can find one to match, please let me know!)


And, she has casters! I think they might be my favorite part. 


And look at those curves. Wonderful.


She's been out in the extra garage since before we moved into the house. The rest of the remodel and moving have been the priority. I'm hoping to get to her later this summer. I can't wait to show her to you all prettied up!